General Information
This article describes how to configure Web site authoring software for LSU Web development and also basic operation. In this article, Microsoft Office SharePoint Designer 2013 is used as example authoring software. Other authoring software could be drastically different to configure and operate, though generally the same information is needed.
For more information, see SharePoint: Microsoft SharePoint: LSU Overview.
Web authoring software allows you to automate most of the mundane programming involved with Web site creation. It also provides a nice environment that will organize your Web site's parts, making it easier to visualize how everything fits together. All authoring software comes with FTP functionality, which allows you to transfer files between the Web site and your local computer. In other words, SharePoint will let you see each page nearly like it will appear on a browser and edit it by dragging, dropping and moving various parts around.
Information You Need:
Username or Login ID: This is the ID issued by Information Technology Services to the Web Site sponsor. Contact the sponsor if you do not know your Username - it should start with "www", such as "wwwmyid".
Password: The password that goes along with the Username, which should also be known by the Web Site sponsor. The sponsor can change this password from their myLSU desktop in the "Personal Preferences" menu by clicking on "Password Management". Only the sponsor will have the option to manage the password.
Create the Web site in SharePoint
1. Start Microsoft Office SharePoint Designer.
2. Go to the File menu and click New.
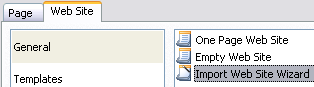
3. In the New window, go to the Web Site tab. Select General on the left column and Import Web Site Wizard on the right column.
4. Specify the location where you wish to store the Web site locally in the field below the columns. The default (My Documents\My Web Sites\mysite1) works fine. Click OK when you are done.

5. The Import Web Site Wizard will start. Select the FTP option from the radio buttons.

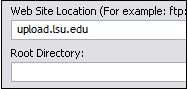
6. Put "upload.lsu.edu" in the Web Site Location field, leave the Root Directory field blank. Click Next.
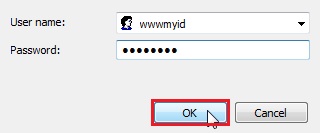
7. A Connect to upload.lsu.edu window will appear, asking for User name and Password. Type in the ITS issued user name and password described earlier in this article (user name should start with "www" such as "wwwmyid"). Press OK.
8. If the credentials were correct, the Choose your destination web location step will appear. Make sure the Add to current Web site option is checked and press Next.
 `
`
9. Click Finish.
10. You should now see a Web Site tab with two columns - Local Web site on the left and Remote Web site on the right. The Local column is the files on your own computer's hard drive, whereas the Remote column is the files on the server. Select all of the files and folders on the Remote Web site column.
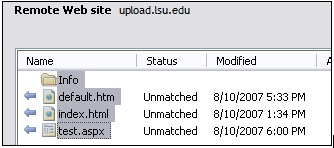
11. The files that have blue arrows next to them are files that you either don't have on your own computer or are newer than the versions on your computer. Generally, this means that you want to copy them in the direction indicated. To copy the highlighted files over, press the left arrow button in between the two columns.

12. Once the files have been copied over, you are ready to begin working on the site!
Uploading files to the Web Site:
After you edit a file or make a new one on your local machine, you still need to upload the file to the Web server before it is accessible on the Internet.
1. Go to the Site menu and select Remote Web Site.
2. If you have not already logged in this session, a prompt for your user name and password will appear. Enter your "www" user name and the password that goes along with it.
3. The files that you updated should have blue arrows next to them and a Status of "Changed" or "Unmatched" (if it is a new file). Highlight the files you want to upload (CTRL+click to select multiple files at once).
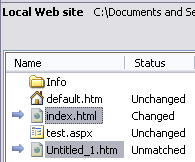
4. Press the right arrow between the two columns.

5. The files will copy to the server and your Web site will be updated!
Note: To download files, highlight them in the Remote Web site column and press the left arrow. Be careful, though, because if you download an older version of a file it will undo all the changes you have made.